IoT 를 위한 백엔드 아키텍쳐를 구성할 때에, MQTT 브로커는 IoT 디바이스로부터 오는 정보를 서버의 가장 앞에서 받아오는 역할을 한다. MQTT 는 굉장히 적은 전력과 리소스로 작동하는 통신 프로토콜로, 굉장히 많은 수의 디바이스로부터 오는 신호를 처리할 수 있도록 경량화되어 있다는 특징이 있다. Broker Cluster 를 구현할 수 있는 프레임워크에는 여러가지가 있는데,
- 유명한 Eclipse Mosquitto
- Jave 기반의 브로커인 HiveMQ
- 또다른 오픈 소스 브로커인 VerneMQ
- 그리고 EMQX
를 찾아볼 수 있다. 그 중, broker cluster 를 구성할 수 있는 솔루션을 찾는 와중, HiveMQ와 같이 많은 솔루션이 Clustering 을 위해서는 Enterprise 버전을 구매해야 하는데, EMQX 는 self-managed 환경에서도 몇가지 제한된 기능 위에서 클러스터를 구성할 수 있다.
추가적으로, Scalable Message Queue 를 구현하기 위해서 MQTT 로 들어오는 많은 양의 메세지를 Kafka Cluster 로 ingest 하는 아키텍쳐를 생각할 수 있는데, MQTT 브로커와 Kafka 브로커를 이어주는 프레임워크로는
- Confluent Platform 에서 제공되는 MQTT Source Connector
- Apache Camel 을 활용한 Camel MQTT Source Kafka Connector
- Lenses.io 의 MQTT Source Connector
등을 찾아볼 수 있는데, Confluent Platform 의 MQTT Source Connector 는 Enterprise 계정이 필요해서, 대안을 찾아보기로 했다.
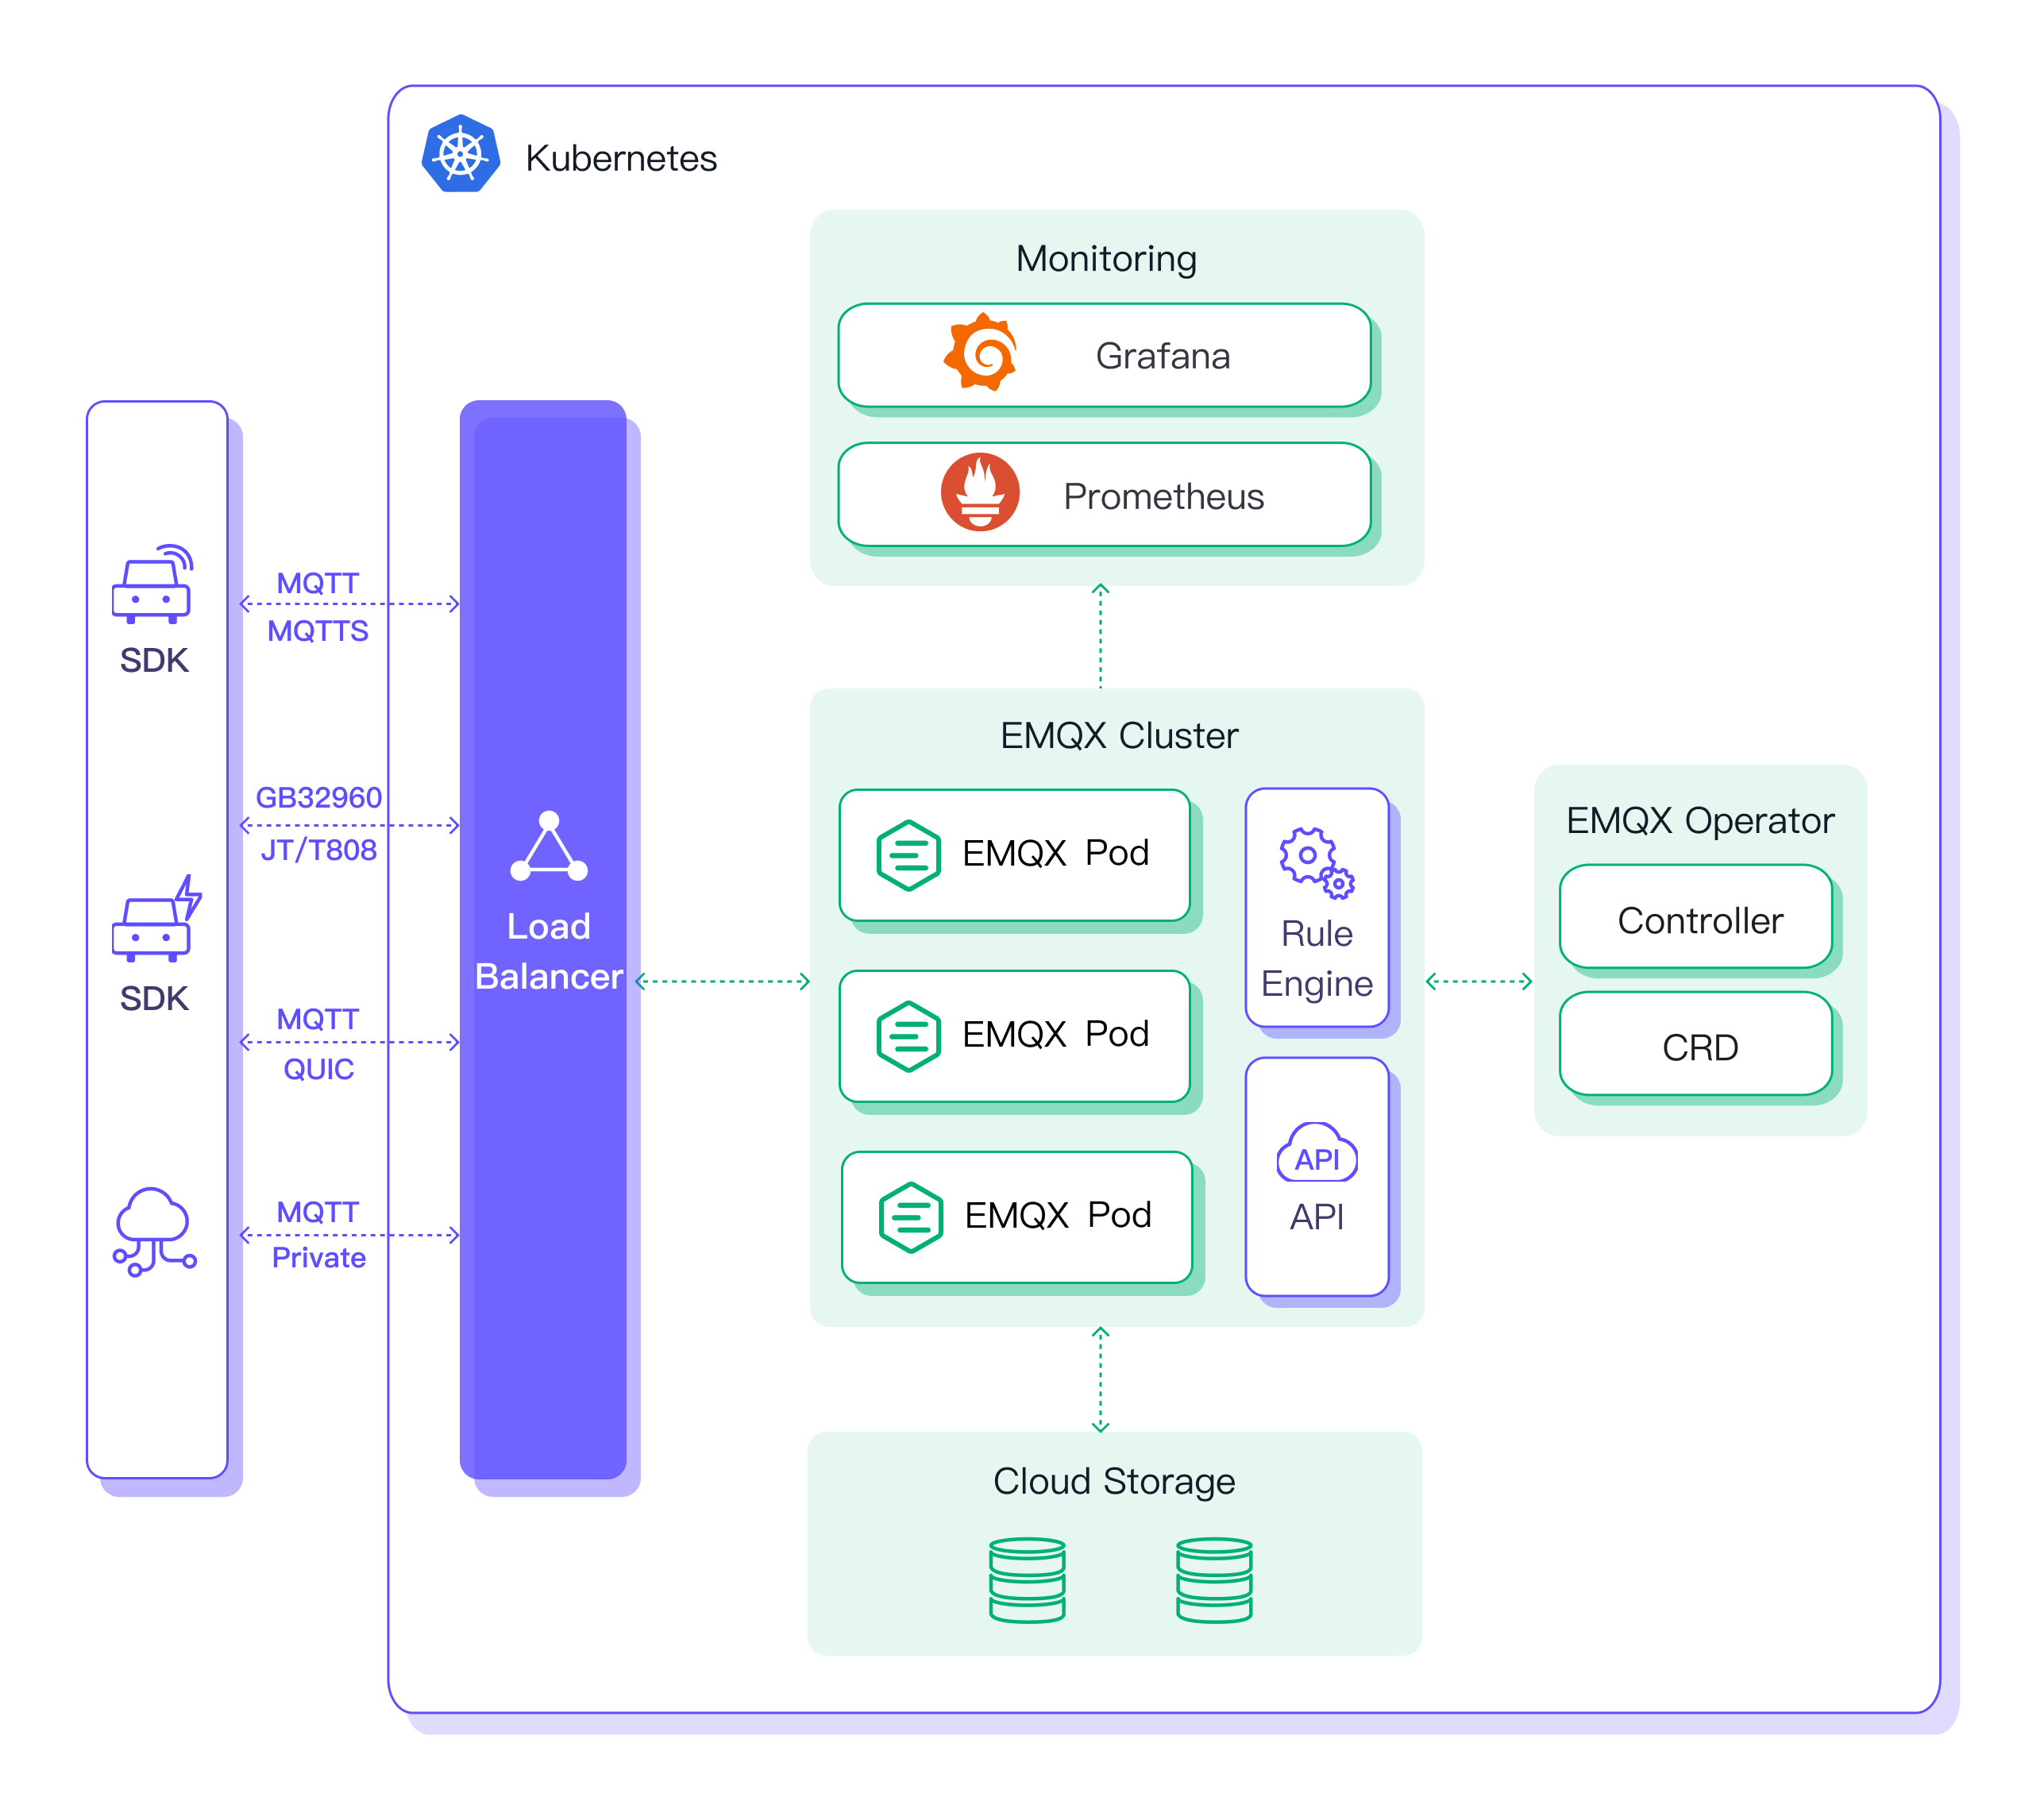
위의 사안들을 고려하여, MQTT 메세지를 받아서 Kafka Broker Cluster 로 ingestion 을 구현하는 아키텍쳐를 시험해 보자. EMQX Broker Cluster 에서 MQTT 메세지들을 받고, Kafka Connect 에서 Kafka Broker Cluster 로 메세지를 전달할 것이다. 완성될 아키텍쳐는 다음과 같다.

EMQX Operator 설치하기
Kubernetes 를 로컬에 구성하는 방법은 게시글을 참고하면 된다.
기존에 존재하는 kubernetes 클러스터 위에 EMQX 클러스터를 배포하는 방법으로 EMQX 에서 추천하는 방식은 EMQX Kubernetes Operator 이다. Helm 과 EMQX Operator 를 이용해서 쿠버네티스 위에 EMQX 클러스터를 구성해보자. 공식문서 를 따라서 진행해 보자.
먼저 cert-manager 를 설치한다.
kubectl create -f https://github.com/jetstack/cert-manager/releases/download/v1.8.2/cert-manager.yaml
설치 후에 cert-manager 라는 namespace 위에 pod 들이 정상적으로 생성된 것을 확인해야 한다.
cert-manager 설치가 완료되면 Helm 을 이용해서 emqx-operator 를 설치한다.
$ helm repo add emqx https://repos.emqx.io/charts
$ helm repo update
$ helm upgrade --install emqx-operator emqx/emqx-operator --namespace emqx-operator-system --create-namespace
정상적으로 helm 을 이용해서 설치가 완료되면, emqx-operator-system 네임스페이스 안에 pod 가 잘 떠있어야 한다.
$ kubectl get pods -n emqx-operator-system
operators-emqx-operator-controller-manager-54f6976557-cbldb   1/1     Running   0          127m
operator 가 준비될 때까지 기다리려면 다음 커맨드를 실행한다.
kubectl wait --for=condition=Ready pods -l "control-plane=controller-manager" -n emqx-operator-system
pod/operators-emqx-operator-controller-manager-54f6976557-cbldb condition met
EMQX Broker Cluster 구성하기
Operator 가 설치되면, 사용자가 Custom Resource Definition 인 EMQX 를 배포하게 되면, operator 가 정의에 따라 클러스터를 구성한다.
Helm 을 이용해서 EMQX 클러스터를 배포해 보자. 다음 커맨드로 helm 차트를 하나 생성한다.
helm create mqtt-cluster
그러면 mqtt-cluster 라는 디렉토리가 생긴다. mqtt-cluster/values.yaml 안의 내용을 전부 삭제하고 다음과 같이 작성한다.
# mqtt-cluster/values.yaml
core:
  replicas: 3
  resources:
    requests:
      cpu: 250m
      memory: 512Mi

replicant:
  replicas: 7
  resources:
    requests:
      cpu: 250m
      memory: 1Gi

service:
  dashboard:
    spec:
      type: LoadBalancer
  listeners:
    spec:
      type: LoadBalancer
위의 값들은 클러스터를 커스터마이즈 하기 위해 설정한 값들이다. 다음은 mqtt-cluster/templates 안의 파일을 전부 삭제하고, cluster.yaml 파일을 생성한다.
cd mqtt-cluster
rm -r templates/*
touch templates/cluster.yaml
cluster.yaml 안에는 다음과 같이 작성한다.
# mqtt-cluster/templates/cluster.yaml
apiVersion: apps.emqx.io/v2beta1
kind: EMQX
metadata:
  name: emqx
  namespace: {{ .Release.Namespace }}
spec:
  image: emqx:5.1
  coreTemplate:
    spec:
      replicas: {{ .Values.core.replicas }}
      resources:
{{ toYaml .Values.core.resources | indent 8 }}
  replicantTemplate:
    spec:
      replicas: {{ .Values.replicant.replicas }}
      resources:
{{ toYaml .Values.replicant.resources | indent 8 }}
  dashboardServiceTemplate:
    spec:
{{ toYaml .Values.service.dashboard.spec | indent 6 }}
  listenersServiceTemplate:
    spec:
{{ toYaml .Values.service.listeners.spec | indent 6 }}
해당 템플릿이 렌더링 된 이후 결과물을 확인하기 위해, 다음과 같이 실행하면,
$ helm template mqtt-cluster
---
# Source: mqtt-cluster/templates/cluster.yaml
apiVersion: apps.emqx.io/v2beta1
kind: EMQX
metadata:
  name: emqx
  namespace: default
spec:
  image: emqx:5.1
  coreTemplate:
    spec:
      replicas: 3
      resources:
        requests:
          cpu: 250m
          memory: 512Mi
  replicantTemplate:
    spec:
      replicas: 7
      resources:
        requests:
          cpu: 250m
          memory: 1Gi
  dashboardServiceTemplate:
    spec:
      type: LoadBalancer
  listenersServiceTemplate:
    spec:
      type: LoadBalancer
최종적으로 배포에 사용되는 k8s manifest 파일을 확인할 수 있다. template 이 오류 없이 잘 출력된다면, 실제로 설치를 해보자.
$ helm install mqtt mqtt-cluster -n mqtt --create-namespace
NAME: mqtt
LAST DEPLOYED: Thu Jan 25 17:20:36 2024
NAMESPACE: mqtt
STATUS: deployed
REVISION: 1
TEST SUITE: None
설치가 정상적으로 이루어졌으면, 설정한 바와 같이 mqtt 라는 네임스페이스 안에, pod 가 생성된다.
$ kc get pods -n mqtt
NAME                              READY   STATUS    RESTARTS   AGE
emqx-core-944bb84db-0             1/1     Running   0          43s
emqx-core-944bb84db-1             1/1     Running   0          43s
emqx-core-944bb84db-2             1/1     Running   0          43s
emqx-replicant-699944997b-4hw26   1/1     Running   0          31s
emqx-replicant-699944997b-7zrtl   1/1     Running   0          31s
emqx-replicant-699944997b-96wb4   1/1     Running   0          31s
emqx-replicant-699944997b-d8zdm   1/1     Running   0          31s
emqx-replicant-699944997b-jpnhh   1/1     Running   0          31s
emqx-replicant-699944997b-m9bcn   1/1     Running   0          31s
emqx-replicant-699944997b-tkkbb   1/1     Running   0          31s
모든 pod 이 실행되고 나면, EMQX Dashboard 에 접속해 보자. EMQX Cluster 를 설정하면, 바로 Dashboard 를 볼 수 있어서 Ops 에 편리하다.
생성된 Service 를 확인해 보면, emqx-dashboard 라는 LoadBalancer 가 생성되어 있을 것이다. 해당 Service 에 접속해 보면 dashboard 에 접속할 수 있다. 만약 minikube 를 사용해서 클러스터를 설정했다면, 다음 커맨드를 실행하면 된다.
minikube service emqx-dashboard -n mqtt
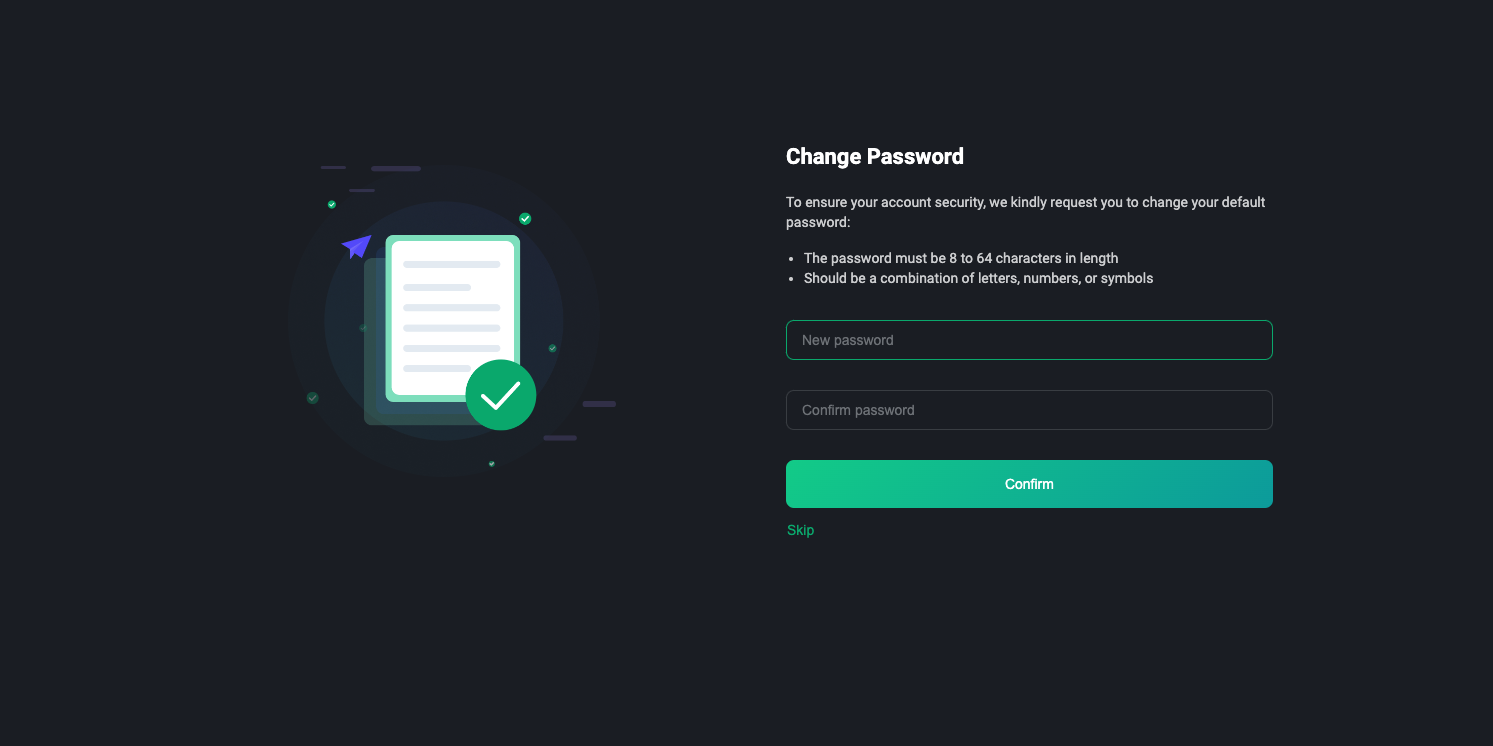
처음 dashboard 에 접속하면 로그인 페이지가 먼저 뜨는데, 초기 아이디/패스워드는 admin/public 이다.

로그인을 하고 나면 패스워드를 변경하도록 한다.
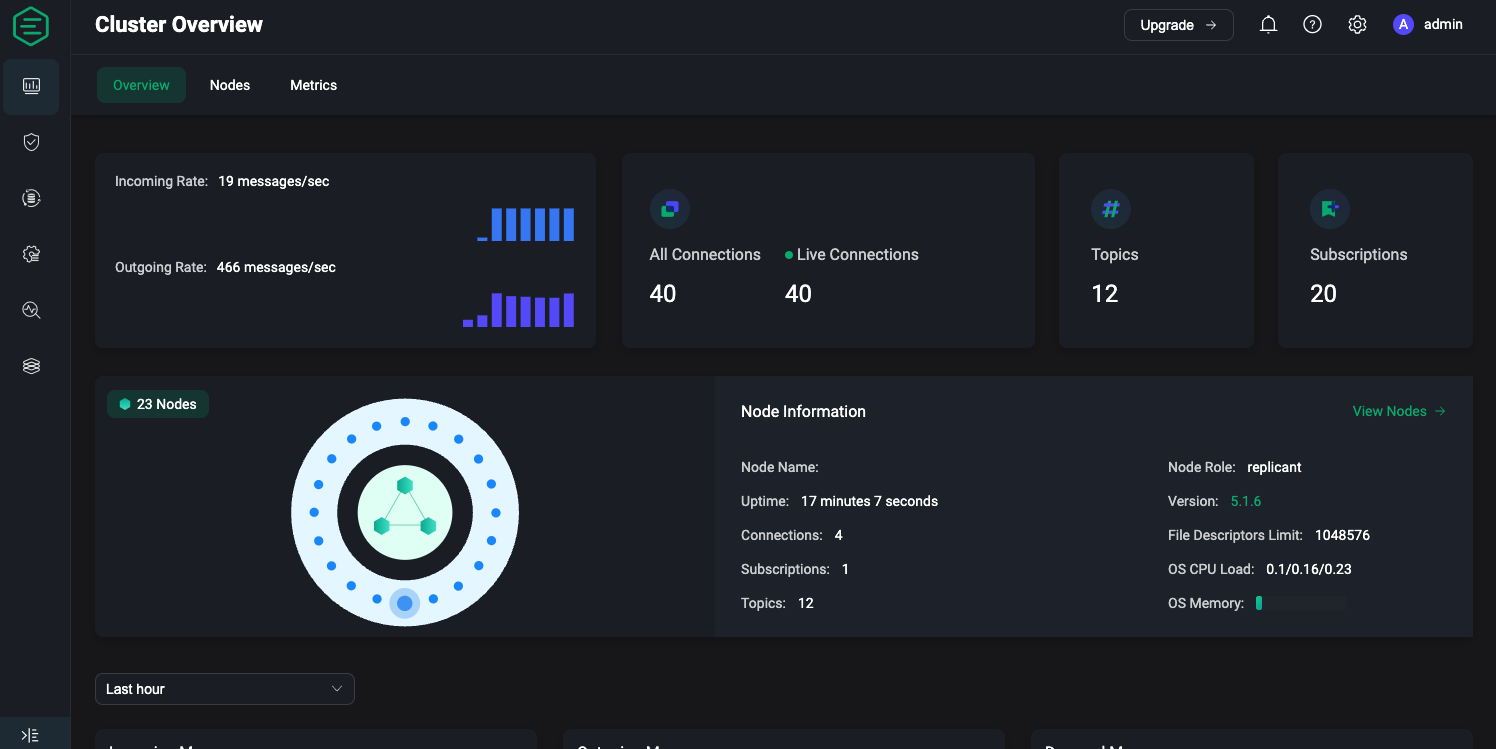
Dashboard 를 보게 되면, 위에서 설정한 것과 같이 core 3대와 replicant 7대가 설정되어 있다.

클러스터 스케일링 하기
위의 values.yaml 을 보면, core.replicas 는 3으로, replicant.replicas 는 7로 설정되어 있다. EMQX에서 발표한 블로그 포스트 를 보면, core 브로커 3대와 replicant 브로커 20대를 이용해서 100 million 연결까지 감당할 수 있었다고 한다. 해당 블로그와 동일하게, core 3대와 replicant 20대를 이용해서 클러스터를 구성해 보자.
Reaching 100M MQTT connections with EMQX 5.0
To stress test the scalability of the MQTT broker EMQX, we established 100M MQTT connections to the clusters of 23 EMQX nodes to see how EMQX performs.
www.emqx.com
values.yaml 을 다음과 같이 수정한다.
# mqtt-cluster/values.yaml
core:
  replicas: 3
  resources:
    requests:
      cpu: 250m
      memory: 512Mi

replicant:
  replicas: 20
  resources:
    requests:
      cpu: 250m
      memory: 1Gi

service:
  dashboard:
    spec:
      type: LoadBalancer
  listeners:
    spec:
      type: LoadBalancer
value 가 수정되었으면, 다음과 같이 실행한다.
$ helm upgrade mqtt mqtt-cluster -n mqtt
Release "mqtt" has been upgraded. Happy Helming!
NAME: mqtt
LAST DEPLOYED: Thu Jan 25 17:29:09 2024
NAMESPACE: mqtt
STATUS: deployed
REVISION: 2
TEST SUITE: None
다시 Dashboard 에 접속해 보면, replicant 노드가 20대로 증가되어 있다. 물론 cpu 와 memory 할당량이 적기 때문에 100 million connection 을 감당할 수 있지는 않을 것이다. 하지만 이러한 topology 의 브로커 클러스터가 굉장히 간편하게 설정된 것을 알 수 있다.

브로커 클러스터 테스트 해보기
mqttx cli tool 을 다운로드 한다. 공식문서 를 따라하면 되고, 필자는 맥북이라서 homebrew 로 설치했다.
brew install emqx/mqttx/mqttx-cli
생성된 Service 중에서 emqx-listeners 를 찾아서, EXTERNAL_IP 를 호스트로 이용해서 메세지를 게시해 보자. minikube 를 사용했다면, dashboard 를 접속했을 때와 같이
minikube service emqx-listeners -n mqtt
를 실행해서 localhost 로 접근하면 된다.
먼저 20대의 subscriber 를 생성해보자.
mqttx bench sub -c 20 -t test -h <IP_ADDRESS> -p 1883
그럼 Dashboard 에도 20개의 connection 이 생긴 것을 볼 수 있다.

이제 20대의 publisher 를 생성해 보자.
mqttx bench pub -c 20 -t test -h <IP_ADDRESS> -p 1883 -t test -m hello
Dashboard 에서 메세지가 들어오는 것을 확인할 수 있다.
결론
EMQX 브로커 클러스터를 helm 과 emqx-kubernetes-operator 를 이용해서 간편하게 구성해 보았다. 다음에는 mqtt 메세지를 kafka 로 ingestion 하는 부분에 대해 다뤄보았으면 한다.
Appendix
전체 코드는 다음에서 확인할 수 있습니다.
GitHub - k2sebeom/emqx-kafka-on-k8s: Deployment of EMQX mqtt broker cluster and connection to kafka cluster
Deployment of EMQX mqtt broker cluster and connection to kafka cluster - GitHub - k2sebeom/emqx-kafka-on-k8s: Deployment of EMQX mqtt broker cluster and connection to kafka cluster
github.com
'개발 일지' 카테고리의 다른 글
| [Next.js] Next 앱 도커 이미지 다이어트하기 (1) | 2024.02.13 |
|---|---|
| [k8s] Kafka Connect 를 이용해서 MQTT 메세지를 Kafka Broker 로 Produce 하기 (0) | 2024.02.13 |
| [k8s] minikube 로 k8s 클러스터 실습하기 (0) | 2024.01.12 |
| [Windows] NSIS 를 이용해서 Forms Application 배포하기 (0) | 2024.01.08 |
| [Windows] NSIS 를 이용해서 설치 파일 패키징하기 (0) | 2024.01.08 |


